
Gemcraft Chapter Two: Chasing Shadows main page
Gemcraft Chapter 2 is a game made by Game in a Bottle and is the long awaited sequel to Gemcraft. It was released on April 4th, 2014. Development for the game started on August 1, 2011. On December 16, 2011, GameinaBottle posted the first screenshot of the game. In his blog post, many spoilers were released for the game.
Changes from Previous Games
Game Mechanics
9x fast button
The game features a new 9x fast button for players who spend hours on Endurance. Also, the menu bar can now be switched from the top to the bottom for the user's preference.
XP bar
The game has the XP bar with now in different graphics.This XP bar in the battle was first introduced on Gemcraft iOS.
Endurance
Endurance mode can now only be attempted after the player beats the allotted number of waves for the level they are playing, and is a button on the victory screen. Achievement progress is not recorded during this mode either.
Difficulty
Levels can now be played on multiple difficulties of Looming, Glaring, and Haunting. Looming is the default difficulty, with harder difficulties resulting in more and tougher monsters in a longer battle, but also reward more experience for completing the battle and increase the experience multipliers of battle traits. Higher difficulties are also the only way to acquire level 100 talisman fragments, as they increase the levels of dropped fragments.
Skills
You start off your journey with only a few skills, but you can gain more by unlocking tome chambers on certain maps by killing a specific number of monsters in specific ways. Also, unlike GC1, GC0 and GCL, the skill cap is increased every tenth wizard level. At level 1, you start with a skill cap of 5, which increases to 6 by level 10, to 7 at level 20, and so on until you reach level 400 and a skill cap of 45.
See: List of Skills
Battle Traits
Similar to GCL's 'Battle Settings', battle traits modify the mechanics of the battle at varying magnitudes based on trait level(TL). Each trait can have between 1 and 7 levels put into it, going from a small change in the monsters to a drastic increase in their stats. Each level in each trait also adds one wave to the battle, making it flexibly longer. Battle traits cost Shadow Cores, requiring the trait level in cores to use that level(Ex. 1 core for trait level 1, 3 cores to up a trait from level 2 to 3, 7 from 6 to 7, etc.). Higher difficulties also make traits cost more, with Glaring costing 2x the shadow cores, and Haunting costing 3x.
Fortunately, if a player loses a battle with battle traits, all Shadow Cores spent on battle traits are returned.
| Trait | Effect |
|---|---|
| Adaptive Carapace | Reduces damage dealt to a monster by 0.5xTL%(.5-3.5%) every time it gets hit, up to 10xTL%(10-70%) total after 20 hits. |
| Mana Lock | Makes your Mana Pool give you earned mana in chunks every 10+15x[TL-1](10-100) seconds. |
| Corrupted Banishment | Restores 18xTL%(18-126%) of monsters health, gives it 10xTL(10-70) extra armor and one layer of shielding per level of the trait. |
| Haste | Wave Stones and sparks move 7xTL%(7-49%) faster. |
| Beacon Storm | Beacons appear every third wave, firing 7xTL%(7-49%) faster and with 27xTL%(27-189%) more hit points. |
| Giant Domination | Giants have 30xTL%(30-210%) more armor, and 5xTL%(5-35%) more health and speed. Waves added by this trait are giants. |
| Swarmling Domination | Swarmlings get -9xTL%(9-63%) duration on slow, freeze, and curse effects. Waves added by this trait are swarmlings. |
| Orblets | Adds 2+TL(3-9) orblets around your orb, giving you a +3% mana gain multiplier per orblet. Monsters that reach your orb steal the orblets, and try to escape the field with them. A permenant -10% mana gain multiplier is applied for every lost orblet. |
| Chasing Shadows | Summons a shadow to the battle per level of the trait. |
The Talisman
An item with sockets that you can fill up with rare monster and chest drops. Each fragment has a rarity that is increased with trait difficulty and level that can be increased with shadow cores. Each Fragment has one or more bonuses that increase as you upgrade the fragment. Fragments with a higher rarity give more powerful bonuses, and more of them. Very powerful fragments even have the ability to increase all of your skill levels so long as you have at least one skill point invested in them, and grant the capability of going beyond the level 45 skill cap and making your skills extremely powerful.
World map
The world map in GC2 is a bit different from the previous Gemcraft games. The markers for each field (called field tokens) now resemble a grade 1 gem, just like Gemcraft Chapter 0 (Gem of eternity) and Gemcraft Chapter 1 (The Forgotten). Some levels resemble higher grade gems such as grade 3.
Unlike other Gemcraft games, levels are now on hextiles. Each hextile has several fields, including any number of special fields such as wizard towers, tome chambers, or vision fields. When you beat a field with a wizard tower, more hextiles will unlock (For example, You completed F4, then you will unlock Hextiles I and H,that means you will also unlock I1.) When you open a tome chamber and complete its field, you gain a new skill. The vision fields are the most challenging, similar to the epic fields in previous games. At the start of the game, you will first unlock Hextile F, and unlock F1.
Wizard tower fields have a hostile wizard tower which will smash your orb of presence if you do not break all locks located on the field when the final wave starts. Locks break when certain conditions are met, for example when you shoot it with a tower a X times, use a freeze spell on it X times, shoot it with a bolt-enhanced gem X times, or shoot it with a beam-enhanced gems for X seconds. If all locks are broken before the last wave begins, you will be given at least 1 hextile, 1 map token, and a battle trait (Example: F4 unlocks Hextiles E and I, tokens E1 and I1, and the haste battle trait). But beware that if you have not broken all locks by the time the last wave begins, the Wizard tower destroys your orb and all locks reset.
World Map levels
See: List of Fields in Gemcraft Chapter 2
Vision Fields
These are fields that let you peek into past or future events. On these levels you will replay some fields from previous Gemcraft games with a fixed set of skills. These levels are considered the most challenging levels in the game. All talisman effects and skills are deactivated for these levels.
Level Map
The maps are redone in GC2:CS, and are filled with more color. Paths can now be made from dirt, sand or whatever terrain you're currently in, as well as stones.
")
")
")
")
")
")
Achievements
See: Achievements (GC2).
Buildings
Shrines lose their buildable status and return to their "special" status from GC0. Walls shrink to down to 1×1 units while the other buildings are 2×2 units. This helps you put your towers where you want with more precision. Amplifers h
The new Gem color update in GC2
ave a deployment time when set to balance out the bonus power of being able to boost up shrines. You will obtain the ability to build amplifiers after you beat the J4 tomb.
In levels whose tiles resemble grade 2(GC1 GC0)/Grade 3(GCL GCCS) gems, a new building known as the "wizard tower" is introduced which will destroy the orb if its locks are not destroyed before the final wave. You will be given things like a Hextile when you unlock it.
In levels whose tiles resemble Grade 1 gems that is like a Tri-swirl design inside,a new building known as the 'Tome chamber' is introduced.Tome chambers open and give you some items when you Complete the task said in the Chamber(For example,Kill X reavers)
Stone circles called nodes appear in some levels, these store energy from monsters that are under the influence of an effect like curse or freeze. Ruined nodes will build up a charge to 10% then damage enemies in range. Some vision maps require you to charge 5 nodes to 100% to beat them.
Imprisoned Gem of Eternity Replicas and the Scythe Gate: Old Gems of Eternity (The Forgotten has been captured 6 times before) can be found caged in some levels, these randomly banish monsters. The Scythe Gate appears on H1 and will also randomly banish enemies.
Obelisks and Corrupted Mana Shards: Obelisks function like beacons randomly bestowing monsters with a random effect and are indestructible. Corrupted Mana Shards are yellow mana shards that, while inexhaustible, will weaken any gems that feed off of them.
Sleeping Hives: These are insidious new enemy buildings that spawn shadow swarmlings (like they came out of a Tomb) for every shot fired by a nearby gem in a tower and each gem bomb used on them. Each Swarmling from here is stronger than the last, so while it is a great method for free kills and hits, it is dangerous to hit the sleeping hive too many times; the swarmling may eventually gain the stats of giants!
Gems
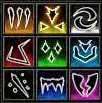
The gems get a total rearrangement in GC2. The lime gem color (previously chain hit power) and the shocking power (previously blue gem color) are both gone, and the black and white gem colors (suppressing and poolbound gem powers) make their first appearance in this game. The gems will now have the following types:
| Gem | Power |
|---|---|
| Red Gem | Chain Hit |
| Blue Gem | Slowing |
| Green Gem | Poison |
| Cyan Gem | Suppressing Healing |
| Black Gem | Bloodbound |
| White Gem | Poolbound |
| Orange Gem | Mana Leeching |
| Yellow Gem | Critical Hit |
| Purple Gem | Armor Tearing |
Poolbound is a new ability that increases all the components of white gems (minus black gems) whenever the mana bar reaches its maximum. The black gem's bloodbound power is similar, except it increases all the components for each hit (minus white gems).
The other new ability is Supressing Healing. Monsters now gradually regenerate health - cyan gems permanently reduce a monster's regeneration rate, to a minimum of zero. All the other gem powers are the same with a few slight changes.
Gem types are not unlockable once a field has started. However, you can learn different skills from skill tomes which will permanently unlock a specific gem type.
Summoning/Enraging
When you use a gem bomb to summon monsters, it increases the health, armor level, and XP gained from the monsters. Every fifth enrage on a single wave will cause a beacon to appear on the field. Summoning is renamed as Enraging in GC2.
Gem Bombs
There is a new method of rapid gem bombing. If you hold SHIFT and press the bombing button, gems from the inventory will automatically be selected for bombing, as in Labyrinth. If you click on the gem bomb button, then hold shift, the new method is used instead. When you click on the screen, a duplicate from the topmost gem in your inventory taken out of your mana is thrown.
Component Abilites
While a gem in the previous games could only have 3 specials at a time, GC2 will let you have as many specials as the number of components in the gem. As more components are added, each special will decrease in power. If they become too weak then they drop off the list of gem abilities, i.e. if poison goes below 1 hp per sec it is removed. Below is a chart of how much power (%) each component has based on how many components are in the gem.
| Number of Components | Strength of Components |
|---|---|
| 1 | 100% |
| 2 | 70% |
| 3 | 50% |
| 4 | 40% |
| 5 | 35% |
| 6 | 30% |
| 7 | 25% |
| 8 | 20% |
| 9 | 20% |
Mana
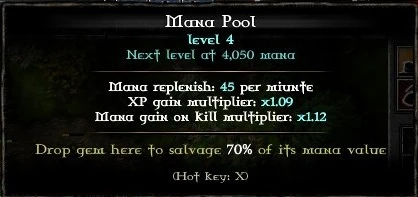
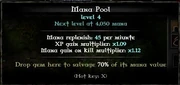
The New infobox for the mana bar
When the mana pool reaches its maximum, it will automatically increase the mana pool size along with the power of any white gems. A new info panel is given to the mana bar, giving more specific info on how much mana you're receiving. The mana bar also replaces the gem anvil from Labyrinth. Now you drop a gem on the bar to destroy it and refund 70% of its mana cost.
Shrines
Shrines return to their special status from GC0, but they can be used over and over as in GCL. None of the previous shrines are returning, and they are replaced with nine new shrines, each based off one of the nine gems. Below is a table of all the shrines:
| Shrine | Gem Based On | Ability |
|---|---|---|
| Shrine of Infection | Cyan Gems | Prevents Healing |
| Shrine of Blades | Yellow Gems | Deals a percentage of health points of targets as damage |
| Shrine of Wisdom | White Gems | Harvests XP from monsters |
| Shrine of Focus | Red Gems | Gives a charge boost to spells depending on how many monsters are hit |
| Shrine of Venom | Green Gems | Deals poison damage over 60 seconds |
| Shrine of Time | Blue Gems | Halves the speed of targeted monsters |
| Gem Enhancement Shrine | Black Gems | Adds damage bonus to the inserted gem (Inserted gem is instantly socketed |
| Shrine of Energy | Orange Gems | Harvests Mana from monsters |
| Shrine of Corrosion | Purple Gems | A powerful way to get rid of monster armor |
Each shrine has a different charging speed and range. New shrines can be made onto the field by a very rare spark, called Shrine Scroll.
Mana Shards
Mana Shards can now have a shell on them that must be completely destroyed before you can harvest the mana. If the shard has a shell, it will be purple, instead of light blue. Mana shards can be created by a spark called Unearthed Shard.
A new kind of shard, called a corrupted shard, is added. This shard has infinite mana, but will permanently reduce the damage of gems that harvest from it.
Beacons
Beacons now have varied ranges, health, and armor level, giving the game more variety. They also have different charge times between the pulses. A list of beacons for GC2 is below.
Many beacons will display their range when you hover with the mouse.
| Beacon | Effect |
|---|---|
| Healer Beacon | Heals all nearby monsters for 5% of their total health. |
| Shield Beacon | Gives all nearby monsters an extra layer of shielding, protecting them from one more hit. |
| Static Beacon | Prevents buildings from built in an 8x8 square around it. This is the only beacon with a set or square range. |
| Discharging Beacon | Forces nearby gems to be resocketed in traps, towers or amplifiers; may fire rapidly enough to prevent gems from being used. |
| Cleansing Beacon | Removes negative effects from monsters in range.(Freeze spell, poison, slow, etc.) |
| Speed Beacon | Gives a permanent, stackable, speed boost to monsters until they are banished. |
| Beacon Protector | Reduces damage dealt to adjacent beacons by 75%. |
Enemies
Enemies are divided into 3 basic classes: Reavers, Swarmlings and Giants.
Runner monsters and armored monsters are removed from the game, instead, all enemy classes can now have up to 3 different bonuses (called Marks, or curses). These bonuses consist of increased speed, armor, health, etc. The bonuses become stronger the higher the round. Some enemies even have special abilities such as forced resocketing within a certain range, spawning a random beacon on the map, or healing their allies.
Flying Ones
There are also random appearances by so called "Flying Ones". These are flying creatures, which usually drop a lot of shadow cores. There are 4 different "flying" monsters.
Apparitions: These spirits of slain wizards fly right across the screen, they are harmless but drop a lot of shadow cores if you kill them. They are white in appearance.
Specters: These dark, twisted beings were once apparitions, but were corrupted by the Forgotten. They fly faster than apparitions and go directly for your most valuable gem. If you don't kill a specter before it reaches your gem, it will unsocket and grab said gem. You can still kill the specters, but if they leave the screen, your gem goes with it! They are magenta in appearance.
Shadows: Shadows are the strongest demons you will encounter, they have lots of health, spawn monsters and shoot projectiles towards your orb to steal your mana, or even steal mana themselves. A Shadow stays on screen until you kill it. They have a significant amount of armor, and this armor level constantly increases, even when paused. A shadow can shift randomly across the screen (becoming invulnerable while moving). If that was not enough, they also continue causing havoc even when the game is paused (albeit at a much slower rate)! You have been warned!
Spires: While not exactly "flying" these creatures walk in a straight line toward your orb, they cannot be banished so if they reach your orb the battle is over (similar to low-health Shadows from GCL). They're slow at least. Unfortunately, they also possess an uncanny ability to completely limit the damage you can inflict upon them, meaning you can never kill them in just one hit, and you may often find yourself needing to use enchantment spells to take them down. The "Beam" enhancement spell is very effective, since its damage is small but continuous and the "Wake of Eternity" strike spell is especially effective since it removes a percentage of health, rather than dealing any damage.
New Features
Heads Up Display
Game in a bottle added a feature where you can move the bar that displays mana and score to the bottom. This makes the wave tiles come from the top, instead of the bottom. However, this feature doesn't appear to be visible in the final game.
The Forgotten
In later levels, as you approach the Spirit Forge, the Forgotten will sometimes pull a nasty trick where the entire HUD is shrouded in shadow for an entire wave (monsters will still come and all placed gems will still fire). All that can be done during this shadow wave is sit and wait for it to pass, no swapping gems, no spells, no gem bombs, and no pause or fast forward options.
Spells
Spells are different abilities which get unlocked by finding the matching skill. There are 3 strike spells and 3 gem enhancing spells. Gem enhancing spells will add an temporary bonus attack to gems in towers and a permanent bonus to gems in traps. Strike spells are used to give monsters special effects to weaken them.
Freeze
Enemies within the range of this spell will be frozen for a period of time. While frozen their armor is divided by 1.5. When killed they explode and deal additional damage to surrounding monsters.
Curse
Enemies within the range of this spell will be cursed for a period of time. While cursed they are more vulnerable to damage and slowing effect.
Wake of Eternity
Enemies within the range of this spell are damaged by 20% of their max HP. Additionally, 40% of armor is shredded, 30% of healing is suppressed and all layers of shield are removed. Every fifth target is also banished.
Bolt
Towers - Gives towers an extra attack in the form of a set number of bolts, depending on how high the bolt skill is. The bolts' base damage and range is an extra +50% range and +120% damage.
Traps - Casting bolt on a trap allows the gem inside to ignore enemy armor.
Beam
Towers - Gives towers an extra attack in the form of a beam that constantly damages enemies within range for a set amount of time. The beam has a 10 tile range limit. Beam lasts anywhere from 12 to 27 seconds depending on the Beam skill level, although the duration is only measured from when the beam is fired. If the beam is not firing, the duration will not be reduced.
Traps - Casting beam on a trap reduces the reload time (increases attack speed) of the trap by 30%
Barrage
Towers - Gives towers an extra attack in form of a set number of barrage shell shots with splash damage that have +20% damage and +30% range. Each shot releases 3 shells
Traps - Casting Barrage on a trap increases special powers by 30%.
Sparks
Sparks are events set in between the waves that trigger bonuses in the game. When activated, they provide one of three different categories. They can provide an instant bonus, create something, or bring a burst of thunders randomly onto the field. The effects can be increased to an extent by using gem bombs on them. Burst of thunders can appear of Stormy weather fields.
Abilities
Prism cascade
Charges spells and shrines
Stone supply
Decreases all building mana costs
Shrine
Summons a random precharged shrine with more damage potential.
Touch of wisdom
Increases the mana bar XP multiplier
Lockdown
Disables and weakens all active beacons.
Unearthed shard
Summons a mana shard having a shell.
Gem Wasps
Gem Wasps are insects that are inside of gems. When a gem is used as a gem bomb, the wasps come out and attack nearby monsters. They have a set amount (changing with gem grade) of time or "stings" on the field (which ever is exhausted first) and every 2nd sting stuns their target. They cannot be controlled in who they attack, but they make gem bombs have a use in the higher waves.
Orblets
Orblets come from a battle trait. They sit around your Orb and can be claimed by monsters who carry them off field. While docked to the orb, they increase the rate at which you gain mana by 3%. When a monster reaches your orb it picks up an Orblet and carries it to the edge of the field. If you kill that monster the orblet it was carrying returns slowly to the orb. It can be picked up again even before reaching the Orb. Until the orblet returns you receive no bonus or penalty. Upon leaving the field, a penalty of - 10% is applied to the rate at which you earn mana.
Talisman powers allow you to increase the heaviness of the orblets, reducing the speed of monsters which are attempting to carry them off-field, and to increase the speed at which they return to the tower if a monster carrying them is killed.
Story (Spoilers Are Present Below, You have been warned...)
It focuses on the wizard from Gemcraft Chapter 1 with The Forgotten on their way to the Spiritforge. As they venture along, they passed through the trap of the wizard called the Scythe Gate. The wizard then was separated from The Forgotten and landed on his old wizard tower. Now the player need to assist the wizard from Gemcraft Labyrinth (a.k.a the Gembearer) and set a trap to capture her before she reaches the Spiritforge. The story also explains the things that you encounter in your journey (tomes, wizard towers, apparitions, etc.)
As you continue onwards towards the Spiritforge your character ponders the summoning of the Forgotten, questioning if the summoning "was really an accident". You also ponder as to the Forgotten's plot and as to her motives.
You eventually discover the summoning fields that gave birth to the abomination and also discover on your journey, the six caged replica's of the gem of eternity (each of which were used to trap the forgotten until she was freed). You continue onwards and find the gem bearer... Dead. However lying by his side is the gem of Eternity. You collect this gem (stating that it feels strange) and continue onwards to the gate of the spiritforge. You then use the Gem of eternity you collected from the deceased Gem bearer to lay waste to the hordes of monsters assaulting you outside the shield of the spirit forge. It is then that things go wrong and the truth is revealed.
The Gem of Eternity after absorbing the essence of the monsters begins to glow with a blinding light and as it does so the camera flashes to the other sealed Gem or Eternity replicas. The replicas then transfer energy to the Gem of Eternity which then fires a powerful burst of magic at the spiritforge shield, destroying it.
It is then revealed that all along the gem that you had collected from the Gem bearers corpse was a fake. It was a replica gem like the other sealed replicas and had been used to hold the Forgotten and as such had been corrupted. In all the previous instances where the Forgotten has been sealed, she would slowly corrupt the gem, twisting the gem's power to her own needs and binding all the fake gems to one another. So when you used the socketed fake you would use the corrupted power of all the gems and would destroy the shield. The Forgotten even let you live to that end after you used the scythe gate.
In the end you were the Forgotten's pawn she used to break into the one place that she could not enter or corrupt.
However she probably never meant for you to live and that may have been a mistake as the game alludes to a sequel in which you enter the Spiritforge after finding the real Gem of Eternity which has been poorly hidden by the Forgotten (found at field Y6, which can only be unlocked after opening the spiritforge shield).
Features
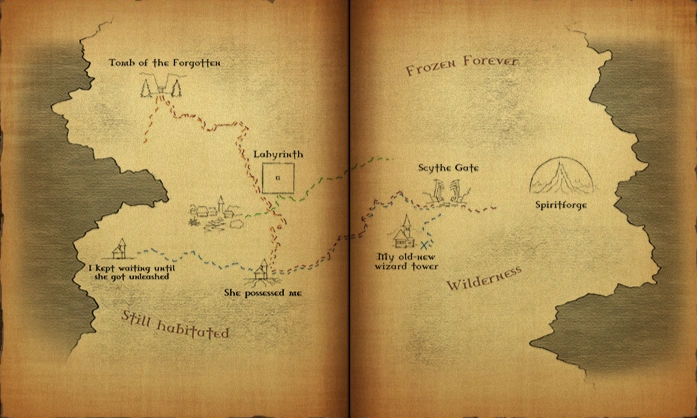
Map of the Series.
Orange-Wizard fron Chapter 0
Red-Forgotten
Blue-Wizard from Chapter 1 (player)
Green-Wizard from Labyrinth
- There is the return of previous epic level stages, called Vision fields marked by a black flame. Each one is a unique challenge.
- There are now specters which steal gems, shadows which shoot at the orb, apparitions and spires which "tank" your gems.
")
")
Steam
Shortly before Gemcraft 2 was released, the game was put on Steam Greenlight and got Greenlit in a week. The Steam version of Gemcraft is going to be released in October 2014 and will cost $9.95. This could possibly mean that there will be content exclusively for the Steam version. http://steamcommunity.com/sharedfiles/filedetails/updates/234463734